
7 Steps Every Parent Should Take
Updated for iOS and iPadOS 26.2– if your child’s device runs iOS 25 or earlier, some features like FaceTime nudity detection or new contact approval in messaging requests may not be available.
Because iOS 26 introduced several updates, double-check every parental control setting after updating. Some toggles may have reset to defaults during installation. Make sure Communication Safety, Screen Time limits, and Ask to Buy are still on and working correctly.
Handing your child their first iPhone can feel overwhelming and scary. You know that phones can open the door to risks they’re not ready for yet but there may be some legitimate reasons to give them a phone.
That’s why I put together this step-by-step guide to iPhone safety settings for kids. Apple has built in some really helpful tools that you should think of as guardrails. They should have been in place and simpler to use from the beginning, and they are still not perfect. They don’t replace your guidance, and they can be frustrating to set up, but they make a big difference. They’re the start to safer phone use and should be paired with ongoing conversations and boundaries. These steps also apply on iPad when your child uses a Child Account. Follow these steps before you hand over an iPhone or iPad. I’ve tried to make this as easy to follow as possible. Even so, some parts are clunky. My goal is to make the process doable so you can add real guardrails while you stay in the lead.
Step 1: Add Your Child to Family Sharing
Family Sharing is your control hub. It lets you manage app downloads, purchases, Screen Time, and location, all from your own phone. You can convert an existing account to a Child Account and choose to share an age range with apps instead of a birthdate.
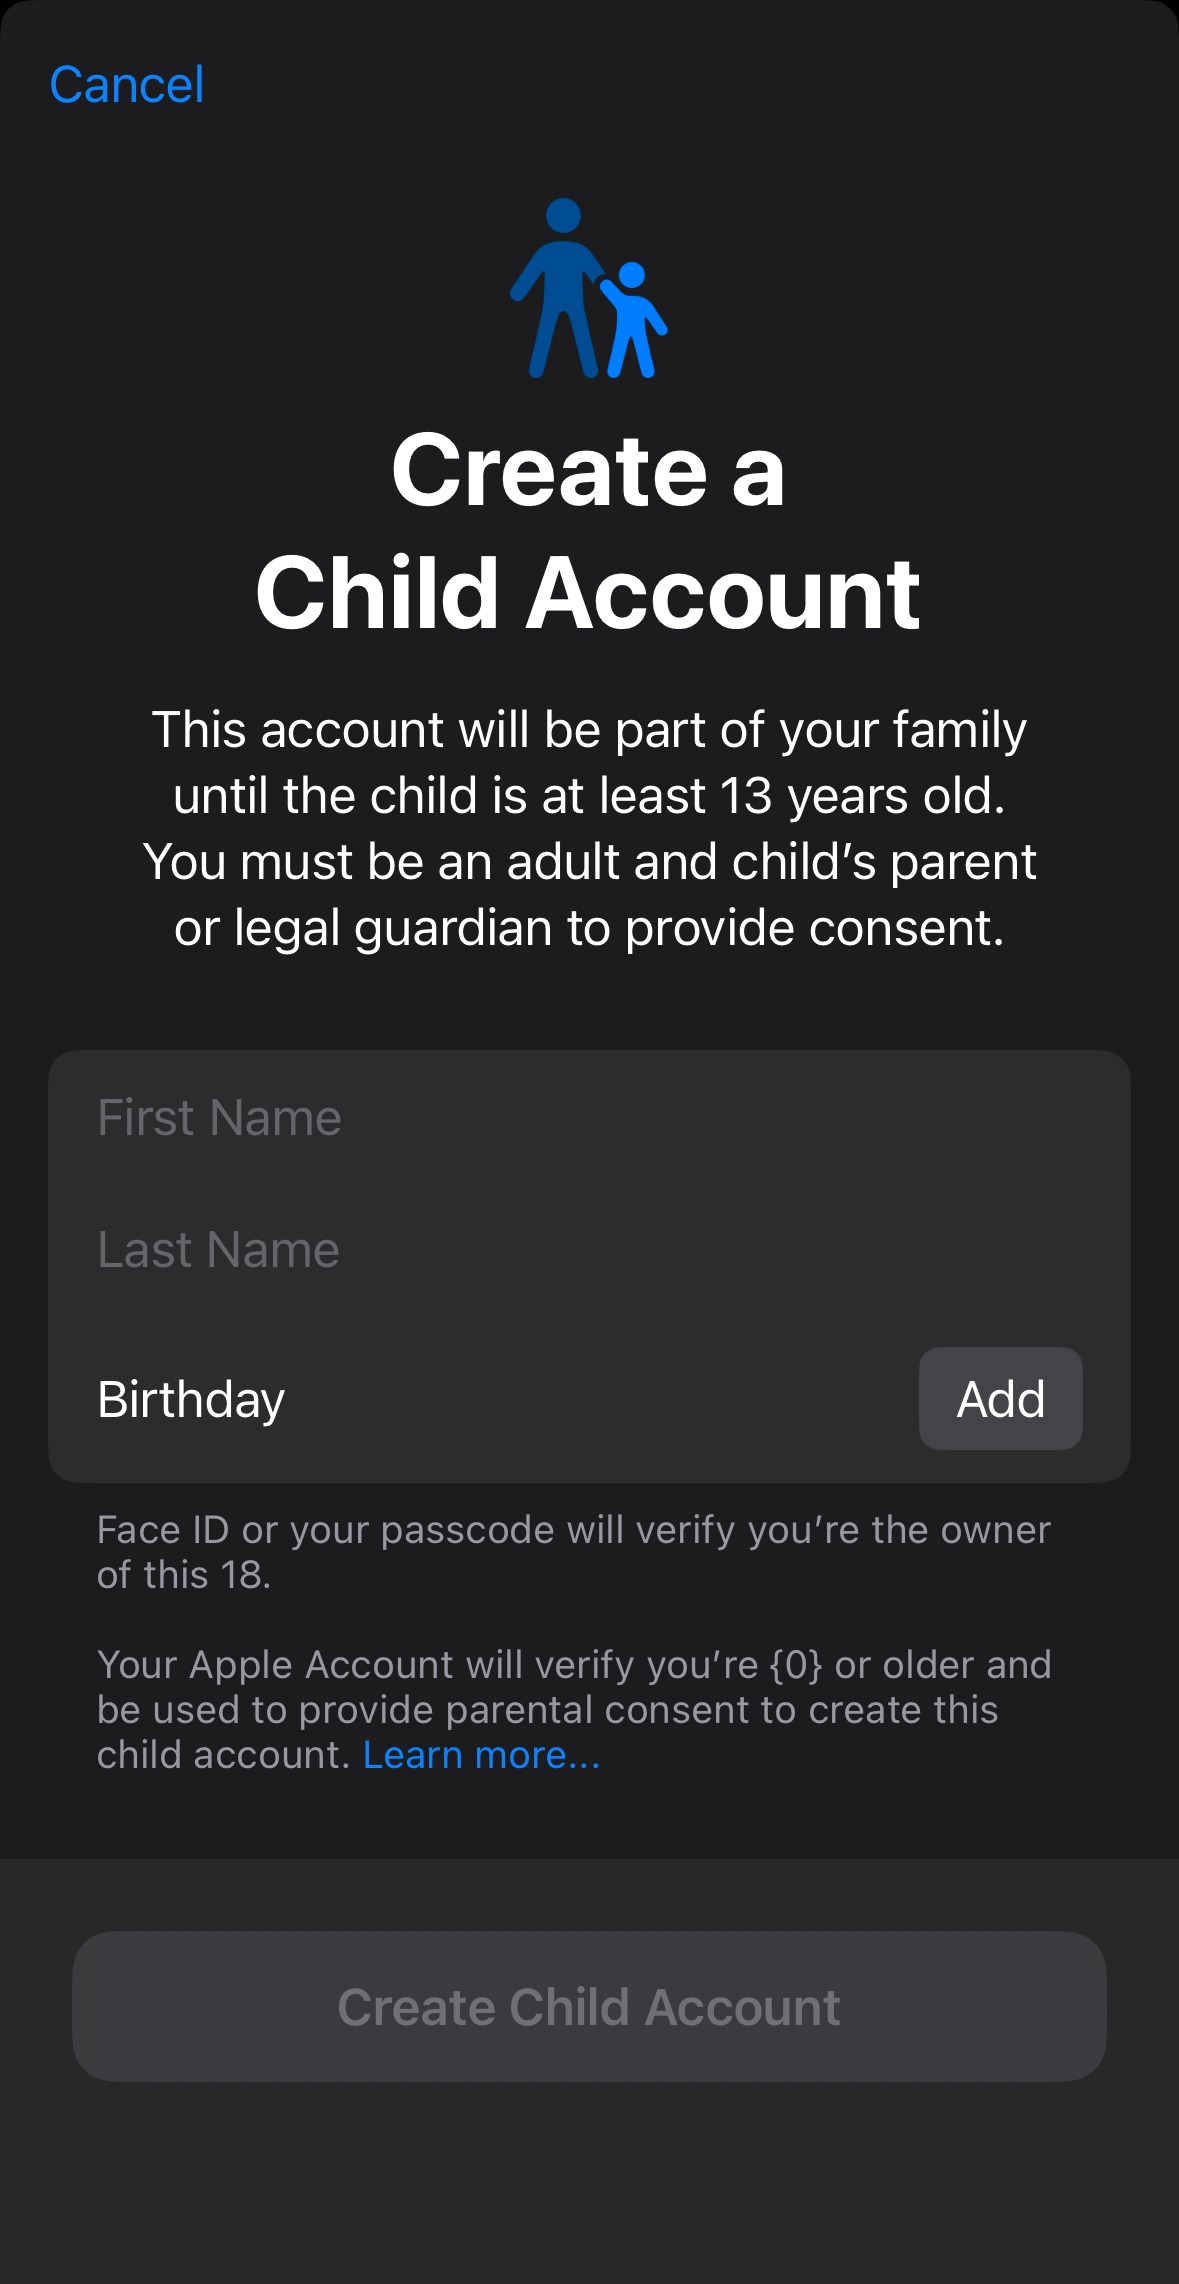
iOS 26 update: The setup process is simpler now. Apple added a streamlined child-account wizard that lets you choose to share only your child’s age range instead of their exact birthdate. This can help apps provide age-appropriate experiences without oversharing personal info.
Go to Settings → Family → Add Member → Create Child Account.
On your child’s device, tap Settings → Connect to Family and follow the prompts.
Step 2: Turn on Ask to Buy

This setting stops surprise downloads or in-app purchases. Every time your child wants to get an app, you get a notification to approve or deny. It also creates natural moments to talk with your child about what apps are healthy (or not) for them right now.
Go to Settings → Family → [child’s name] → Ask to Buy → Require Approval (see screenshot).
Step 3: Set Up Screen Time with a Parent Passcode
Screen Time is the command center for limits. With a parent-only code, you’re the one who controls changes (write it down somewhere safe).
Go to Settings → Family → [child’s name] → Screen Time → Turn On Screen Time.
Create a Screen Time passcode that only you know (and make sure it’s different from the phone’s passcode). In the next steps we’ll go through the settings to make it useful.
Step 4: Enable Communication Safety
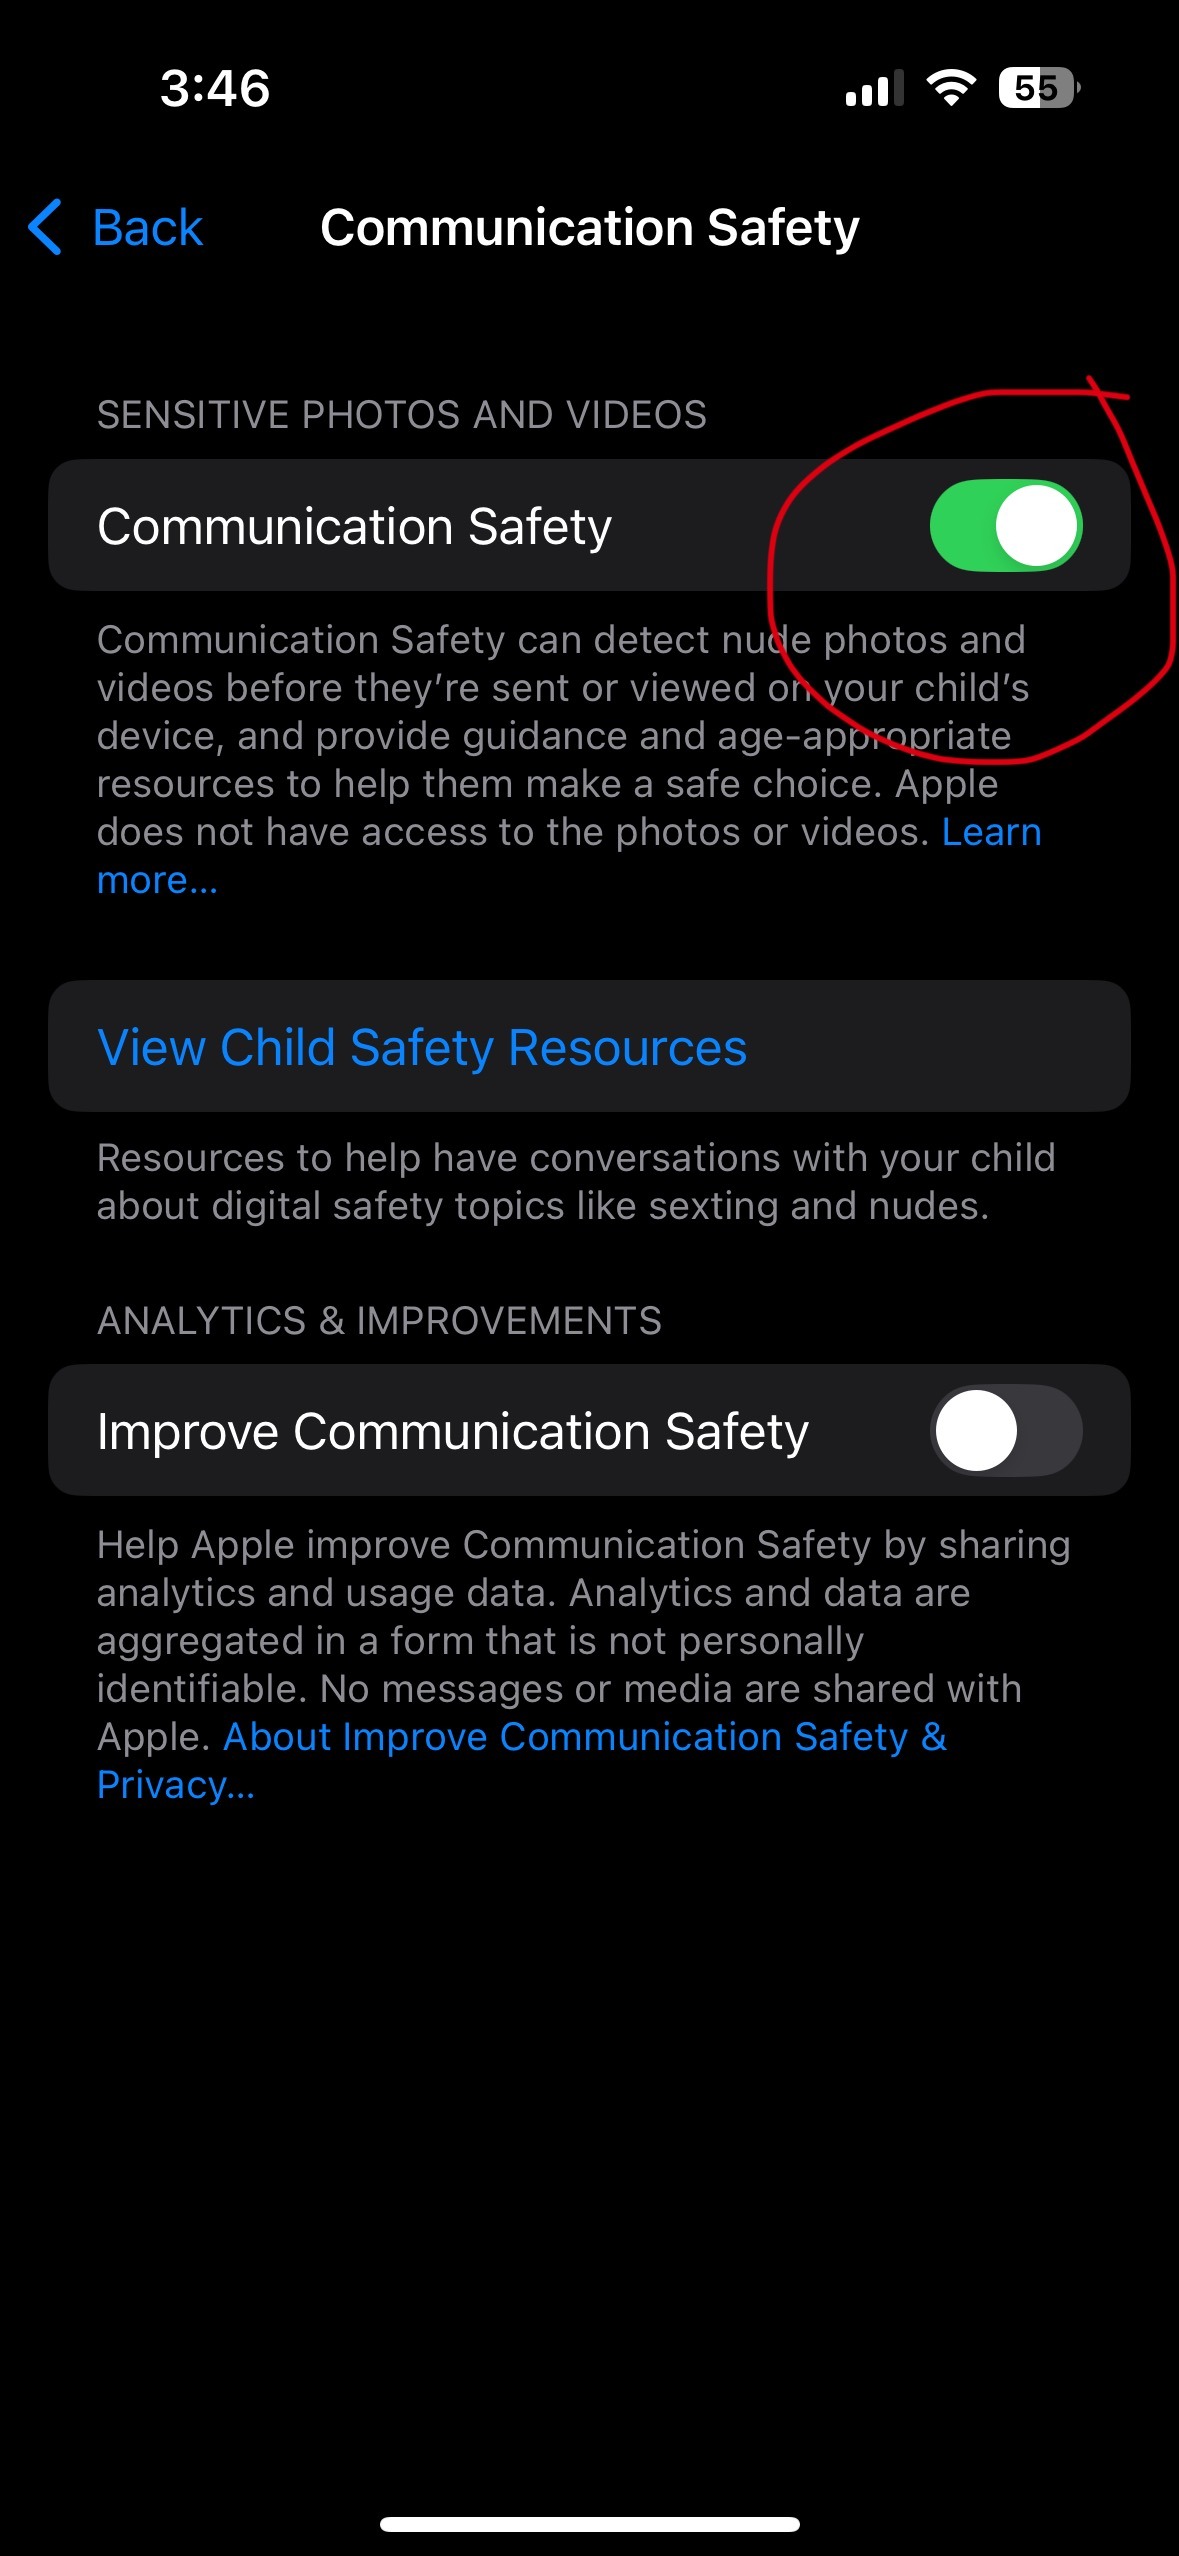
This feature automatically blurs nude photos or videos your child might receive or try to send. They’ll get a warning but no one at Apple sees the messages.
FYI: this is NOT a full block. Under 13 requires your Screen Time passcode (which you are keeping only to yourself). Teens can tap “View anyway.” Apple does not see the image and you are not auto-notified. Kids can also choose Don’t view, Message a trusted adult, Block, or Leave the call.
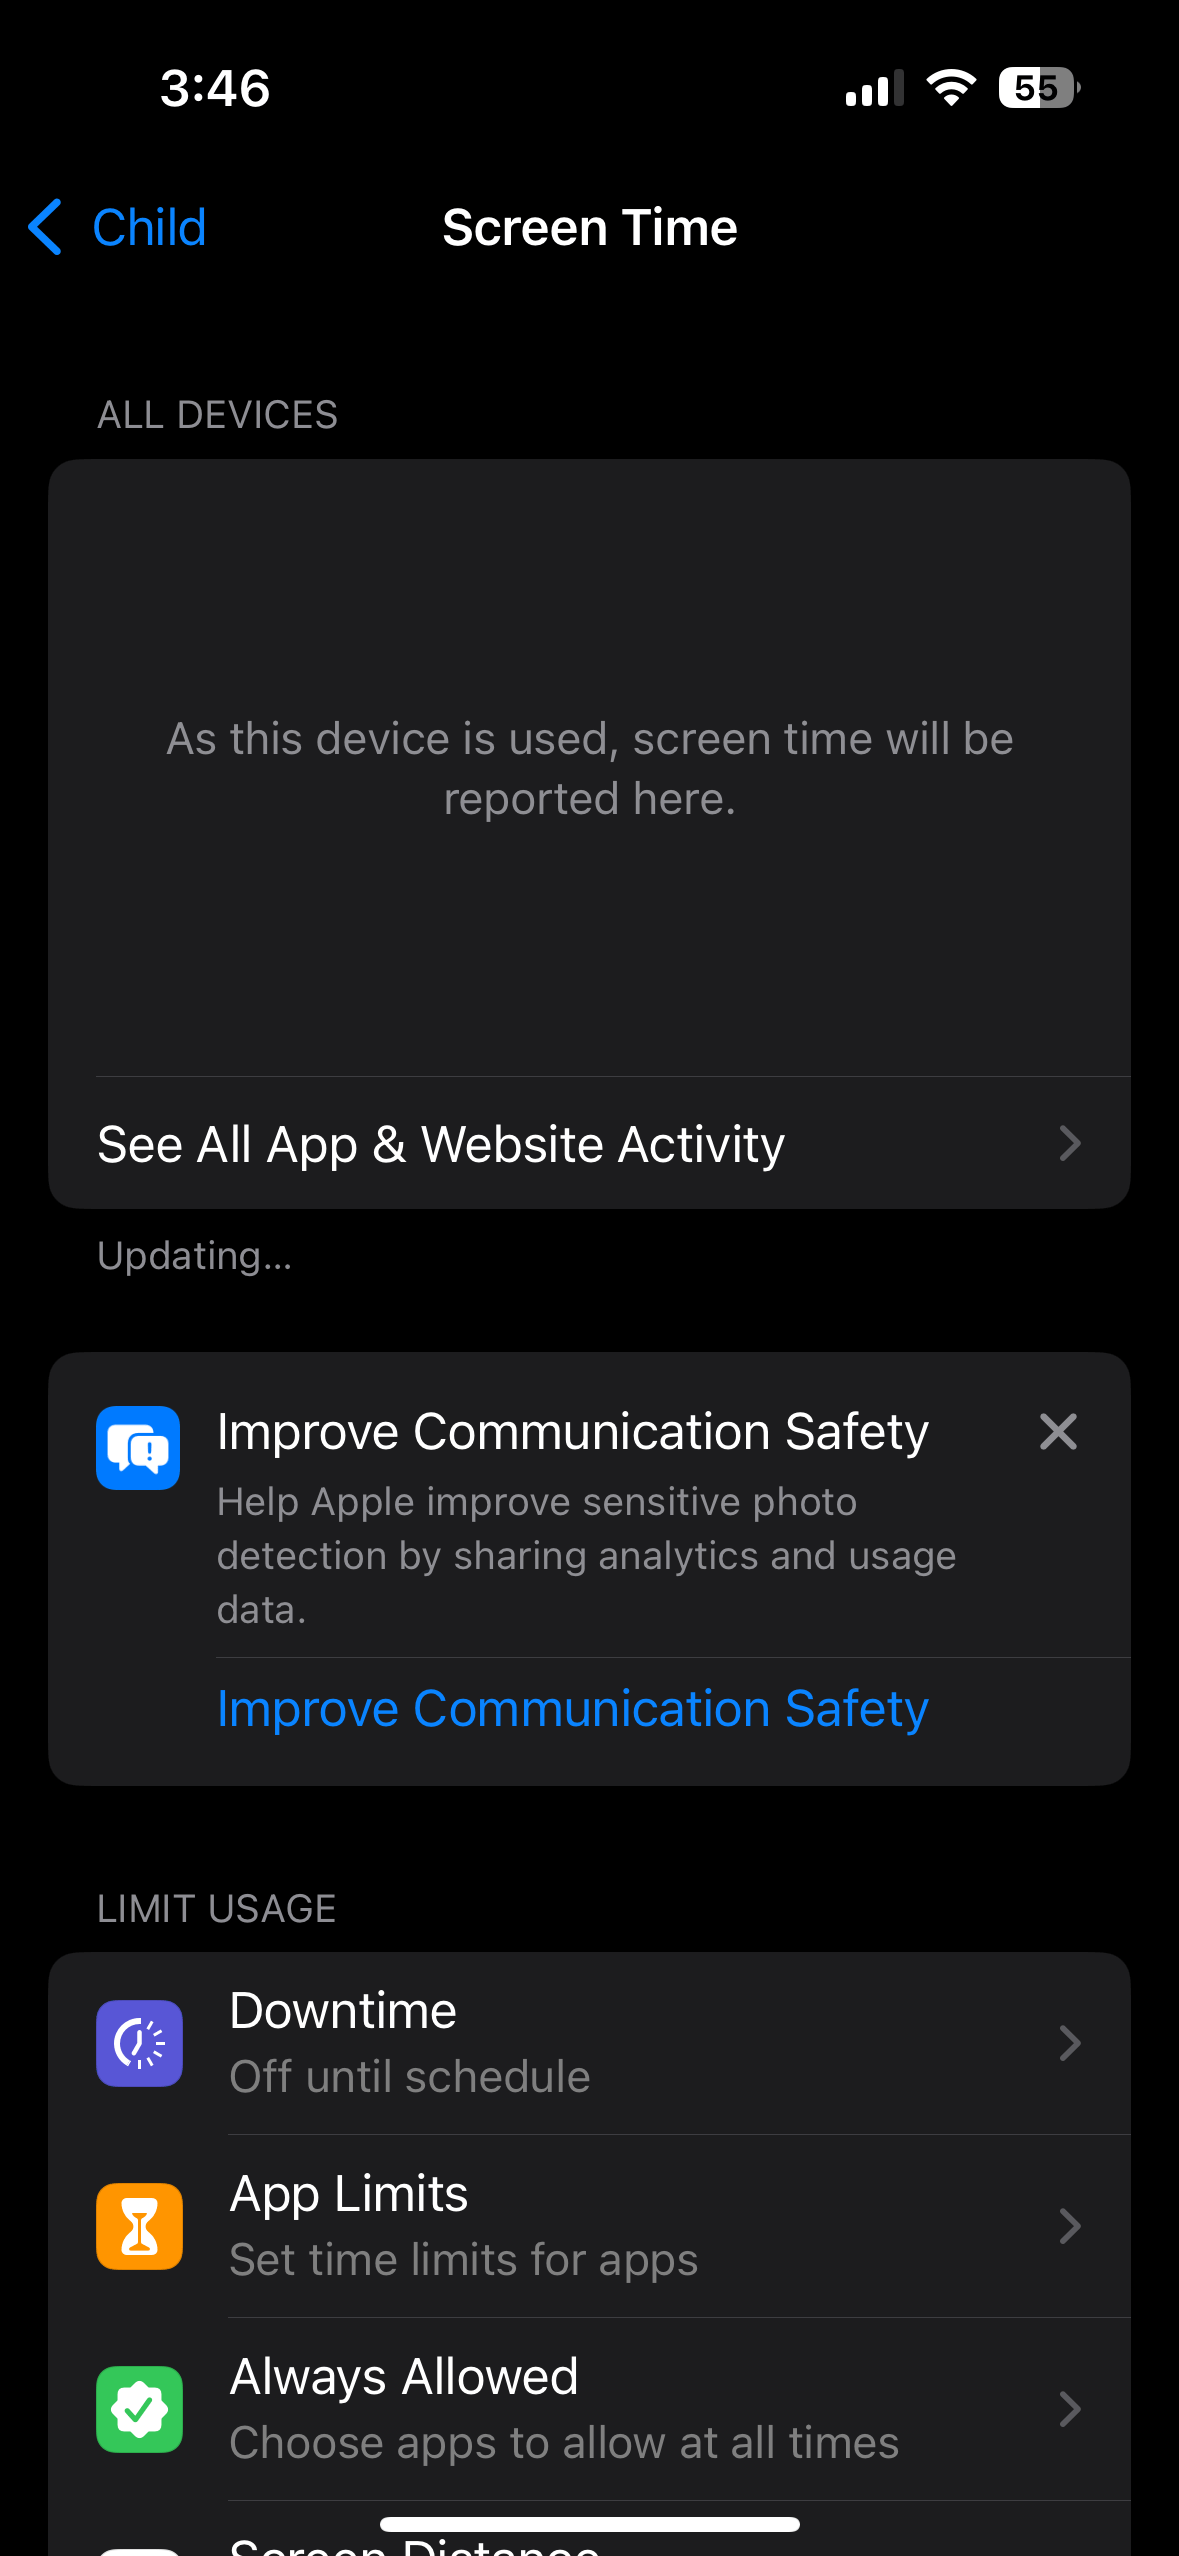
iOS 26/iPadOS26 update: Communication Safety now also works during FaceTime video calls. It automatically blurs nudity detected in live video. It’s also been expanded to cover Shared Photo Albums inside the Photos app.
Go to Settings → Family → [child’s name] → Screen Time → Communication Safety → On (see screenshot).
Step 5: Block Adult Content with Content & Privacy Restrictions
This step consists of a lot of other small ones and it can start to feel overwhelming. These choices aren’t about being “right or wrong,” they’re about making intentional decisions that match your child’s maturity, instead of letting Apple decide by default. Here you’ll lock in what kind of media, web content, and game features your child can access. Take it one switch at a time, and remember: every setting you choose is also a chance to start a conversation. For example: “We’re turning off multiplayer games for now because you’re still learning how to handle online play. When you’re older, we’ll revisit it together.”
If you get lost start back at the first part of step 5 to get back on track.
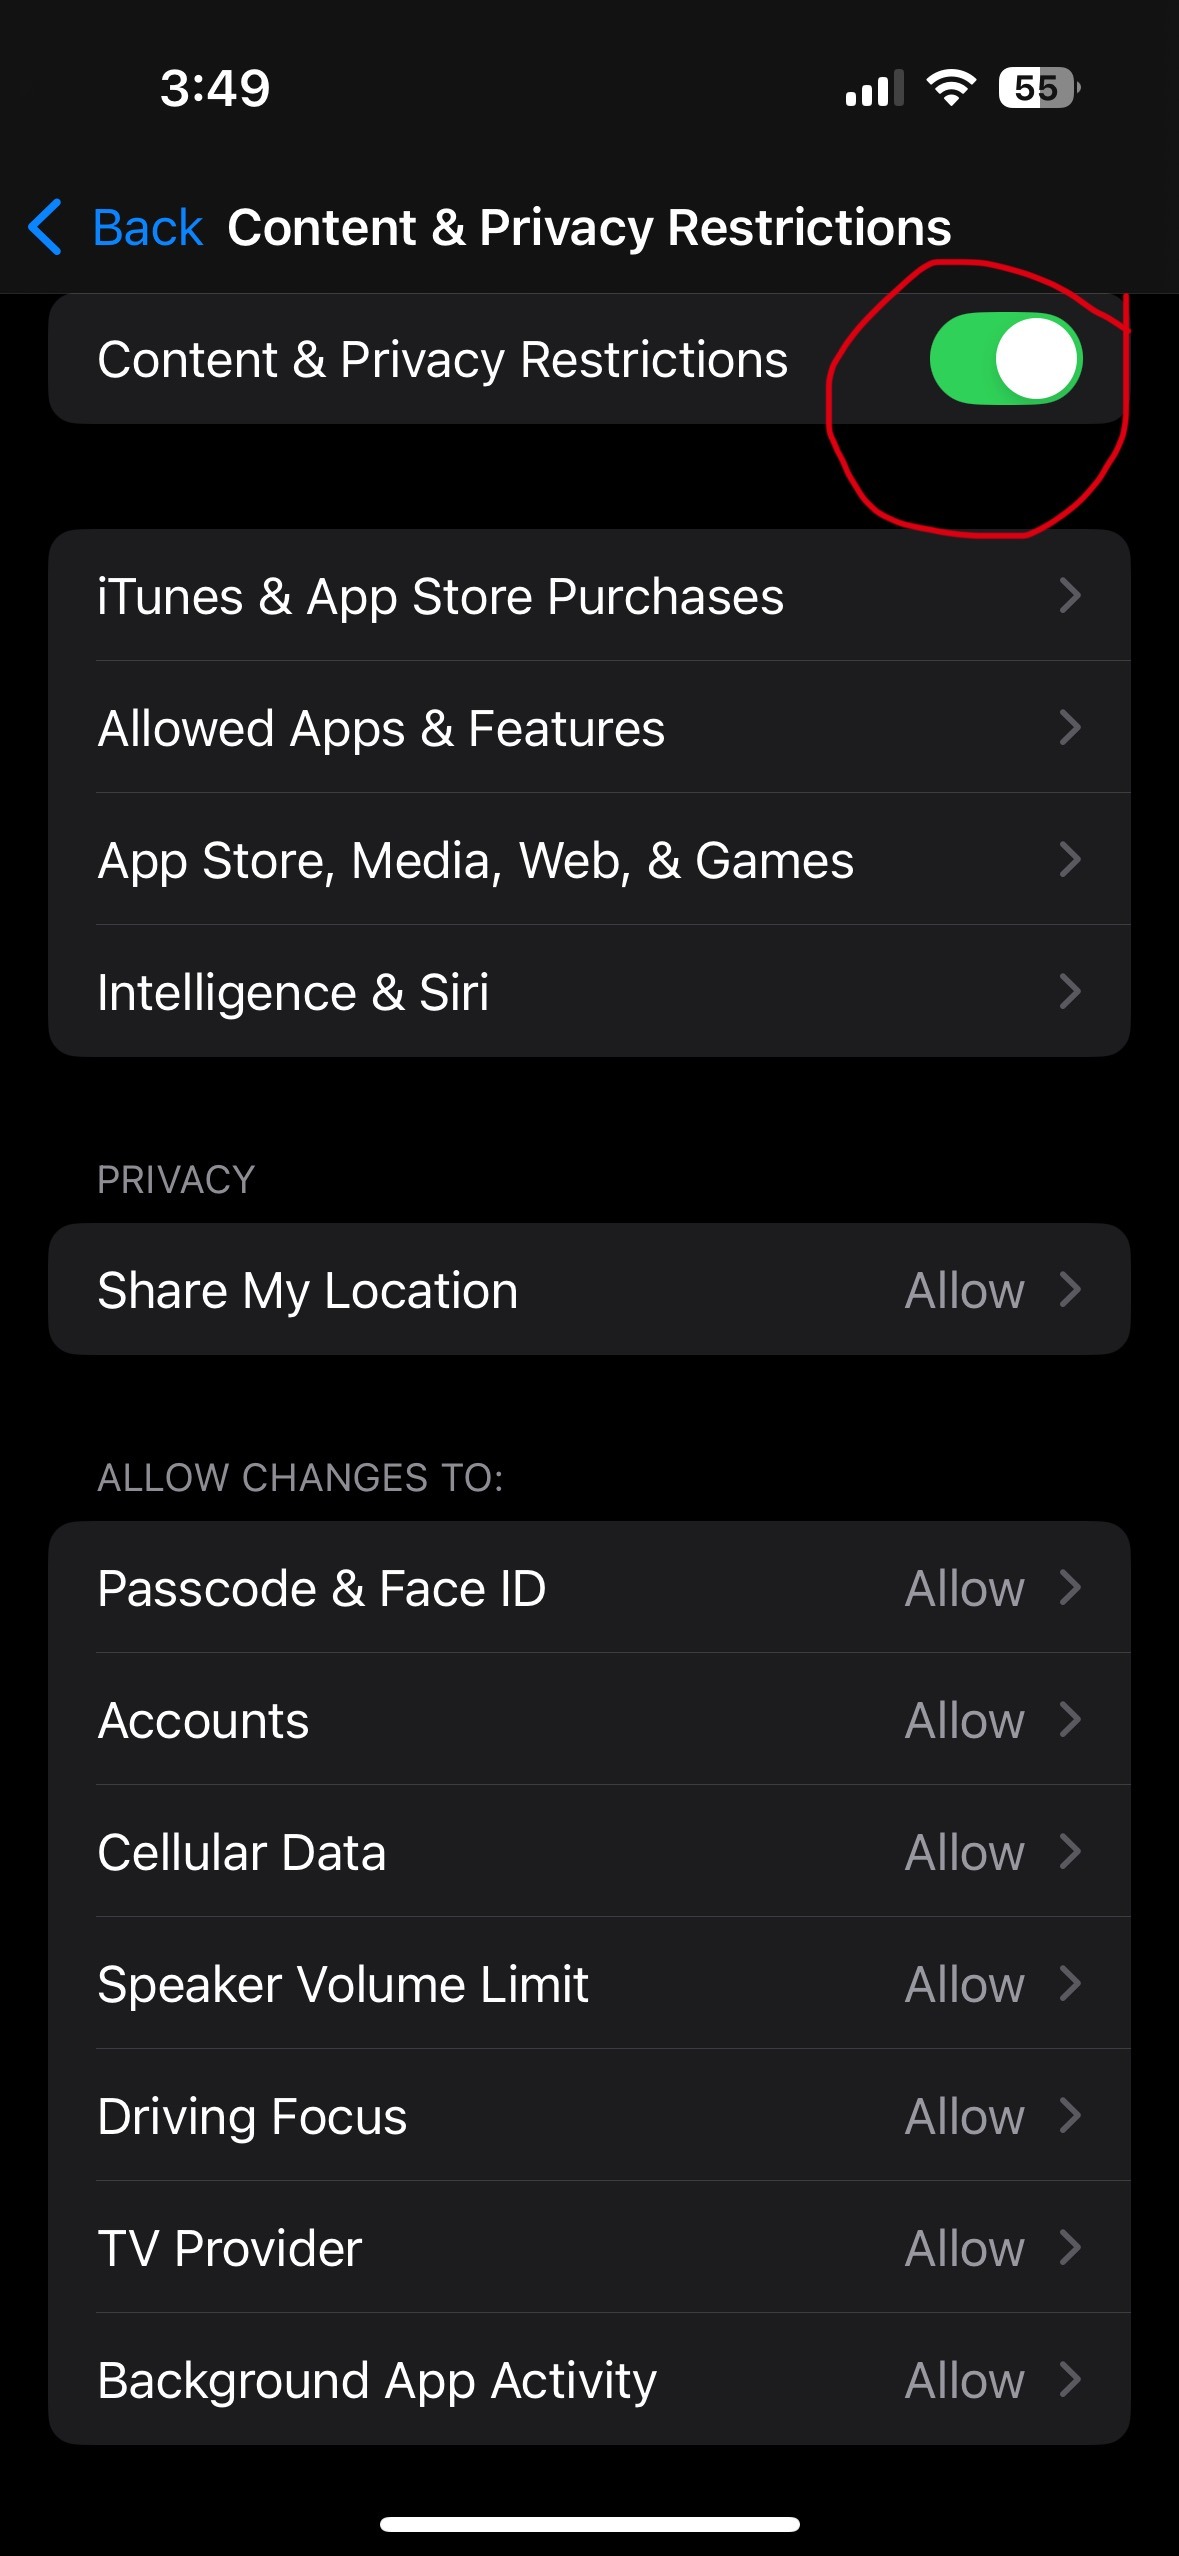
First, go to Settings → Family → [child’s name] → Screen Time → Content & Privacy Restrictions → Toggle setting to ON (see screenshot).
Allowed Media
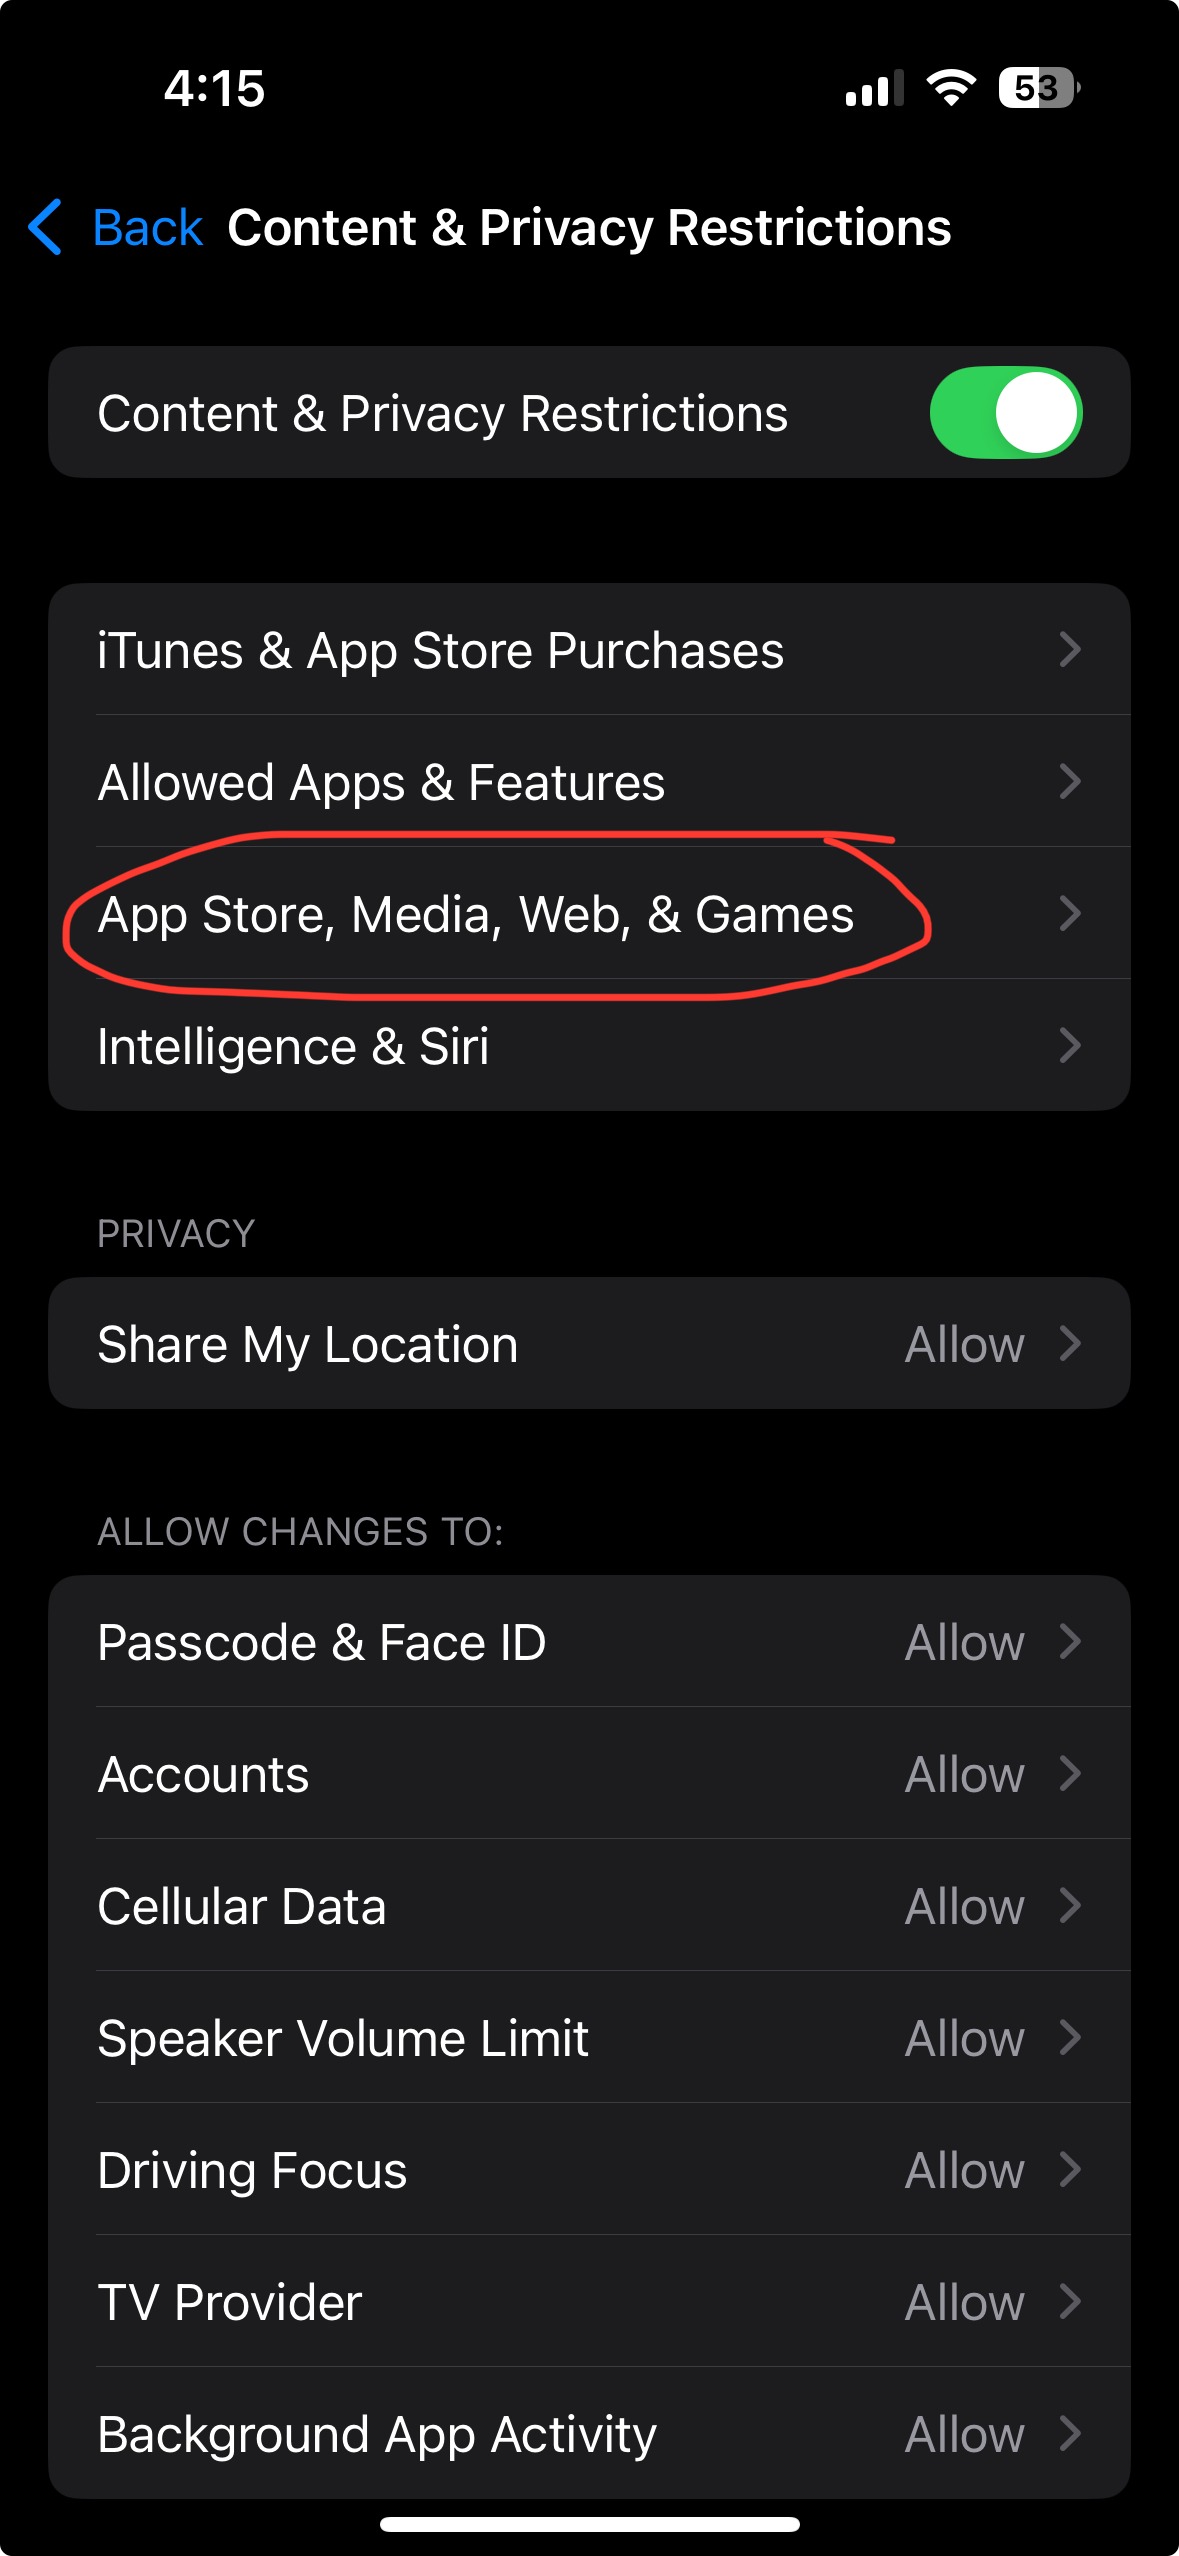
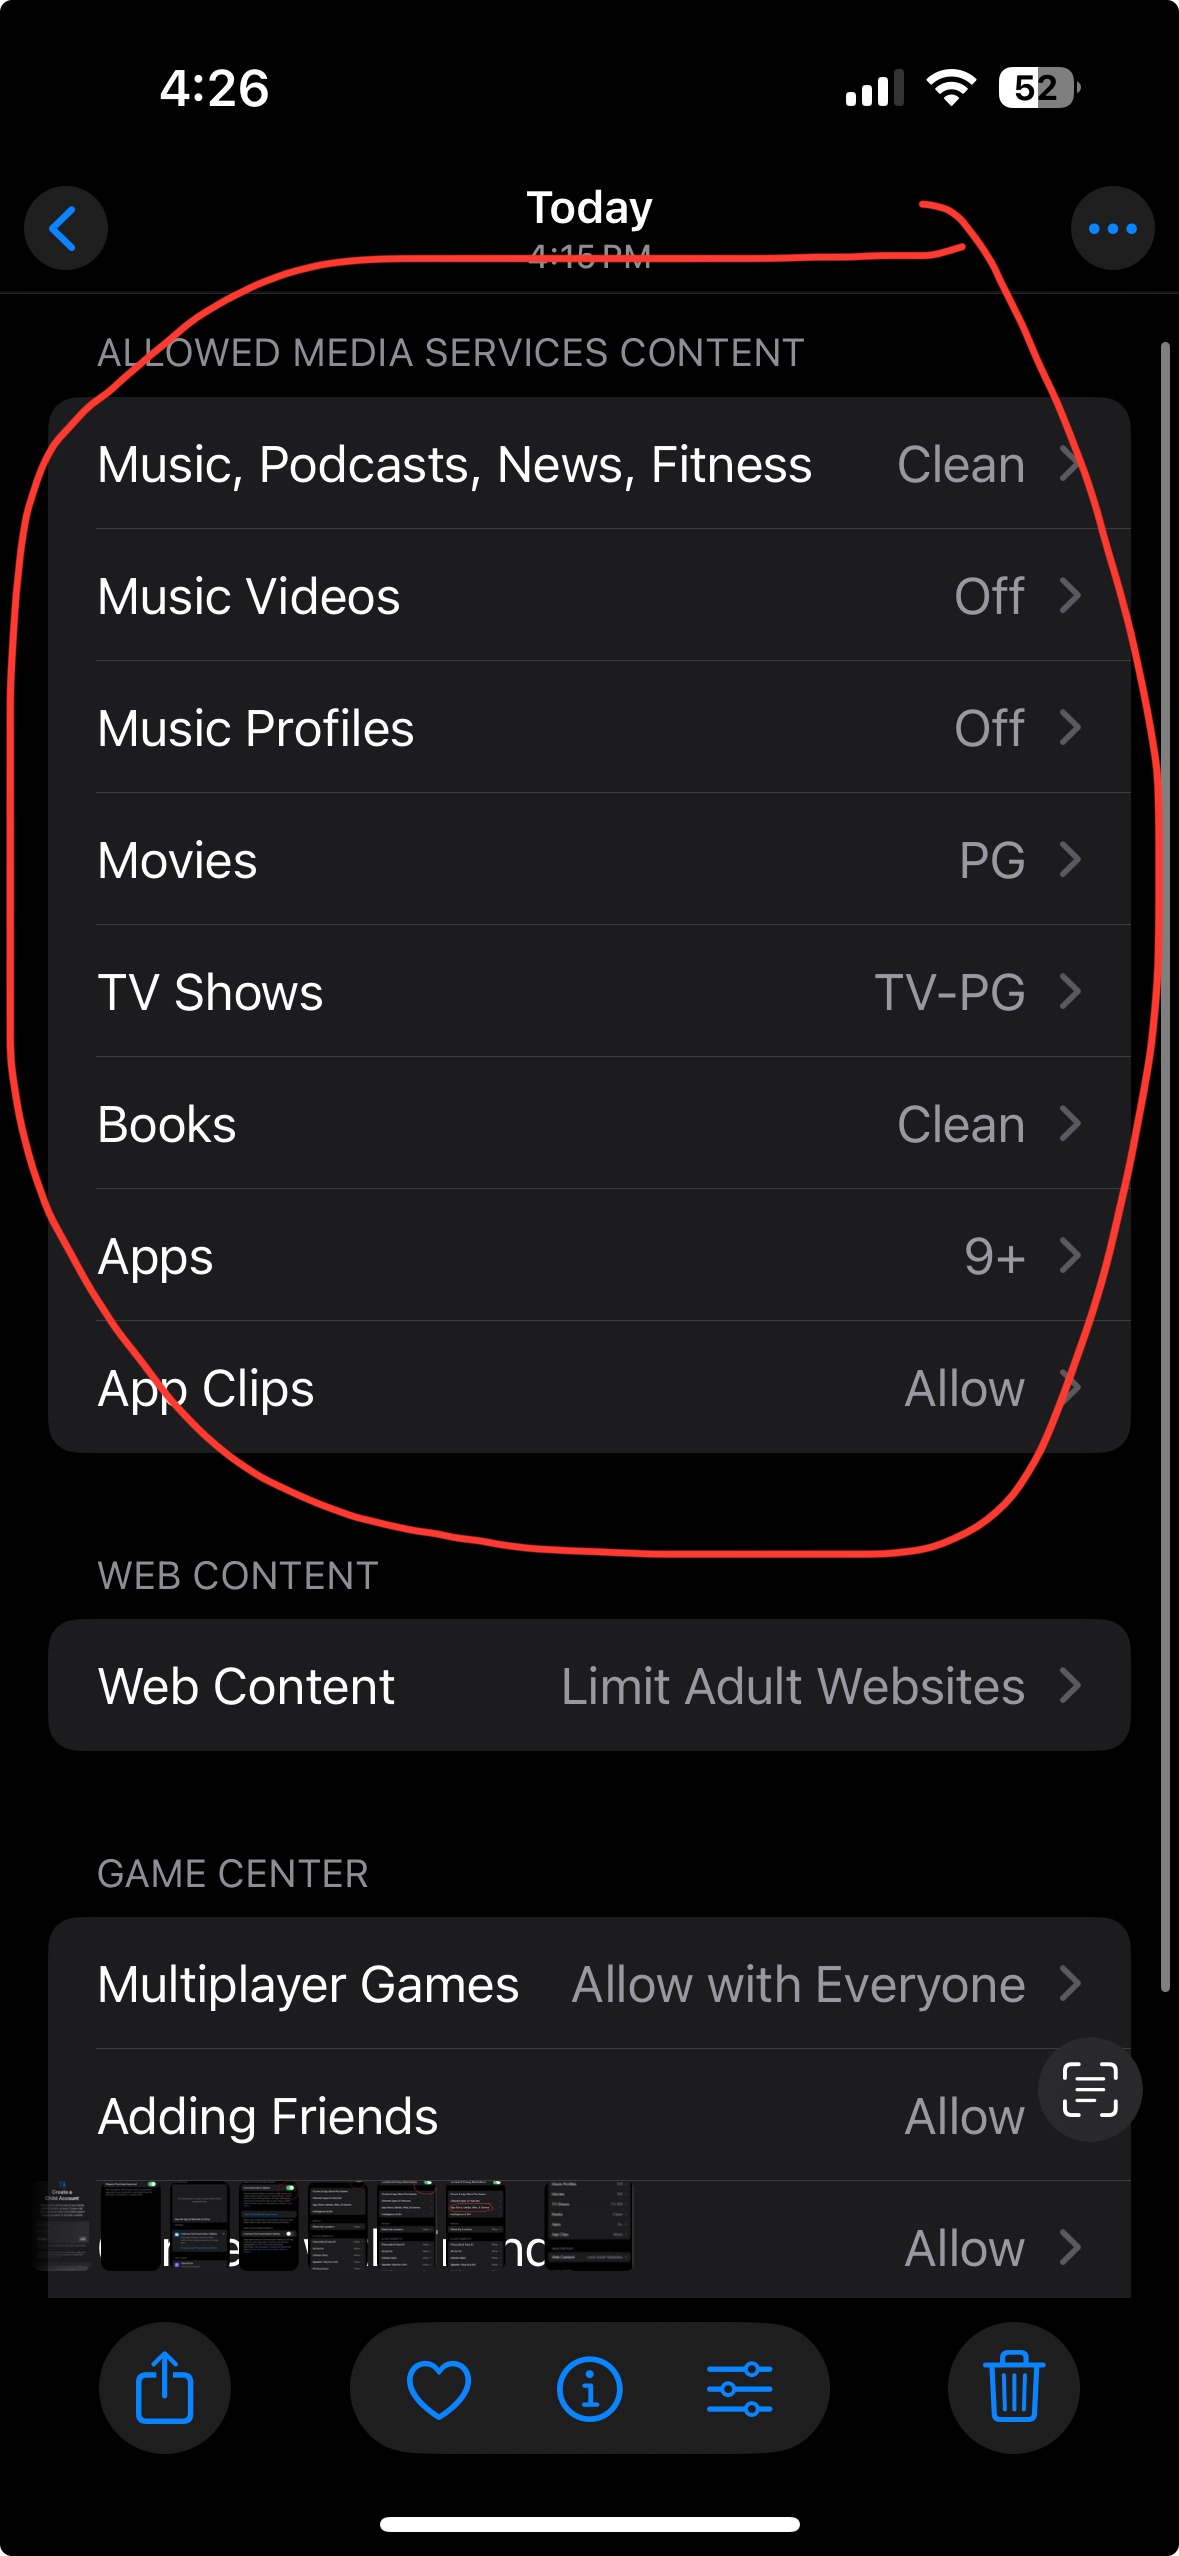
You’ll find allowed media under where you just turned on the Content & Privacy Restrictions. Within that screen you’ll see App Store, Media, & Web Games (first pic, below) you’ll find the settings for Allowed Media Services (second pic, below). Here’s how to approach these settings:
-
Music, Podcasts & News → Set to Clean for tweens and most younger teens. Explicit allows strong language and adult themes.
-
Music Videos → Keep Off for younger kids. Turn On only if you’re okay with video content, which is often less filtered than the audio.
-
Music Profiles & Posts → These allow kids to share or see profiles inside Apple Music. Turn Off for children under 13. On can be fine for older teens if you’re comfortable with it.
-
Movies & TV Shows → Choose the ratings that fit your family rules (e.g., PG/PG-13 for movies, TV-PG/TV-14 for shows).
-
Books → Set to Clean for tweens. Explicit opens up more adult-themed titles in Apple Books.
-
App Clips → These are mini-apps for things like parking meters or scooters. Allow if your teen will need them. Don’t Allow if your child is younger and doesn’t.
iOS 26 update: Apple ratings are more detailed now, with options like 13+, 16+, and 18+. That lets you set limits that fit your child, not just a broad category.
Web Content
Inside Content & Privacy Restrictions → App Store, Media, Web, & Games → Web Content (it’s in the same location as Allowed Media Services where you just were).
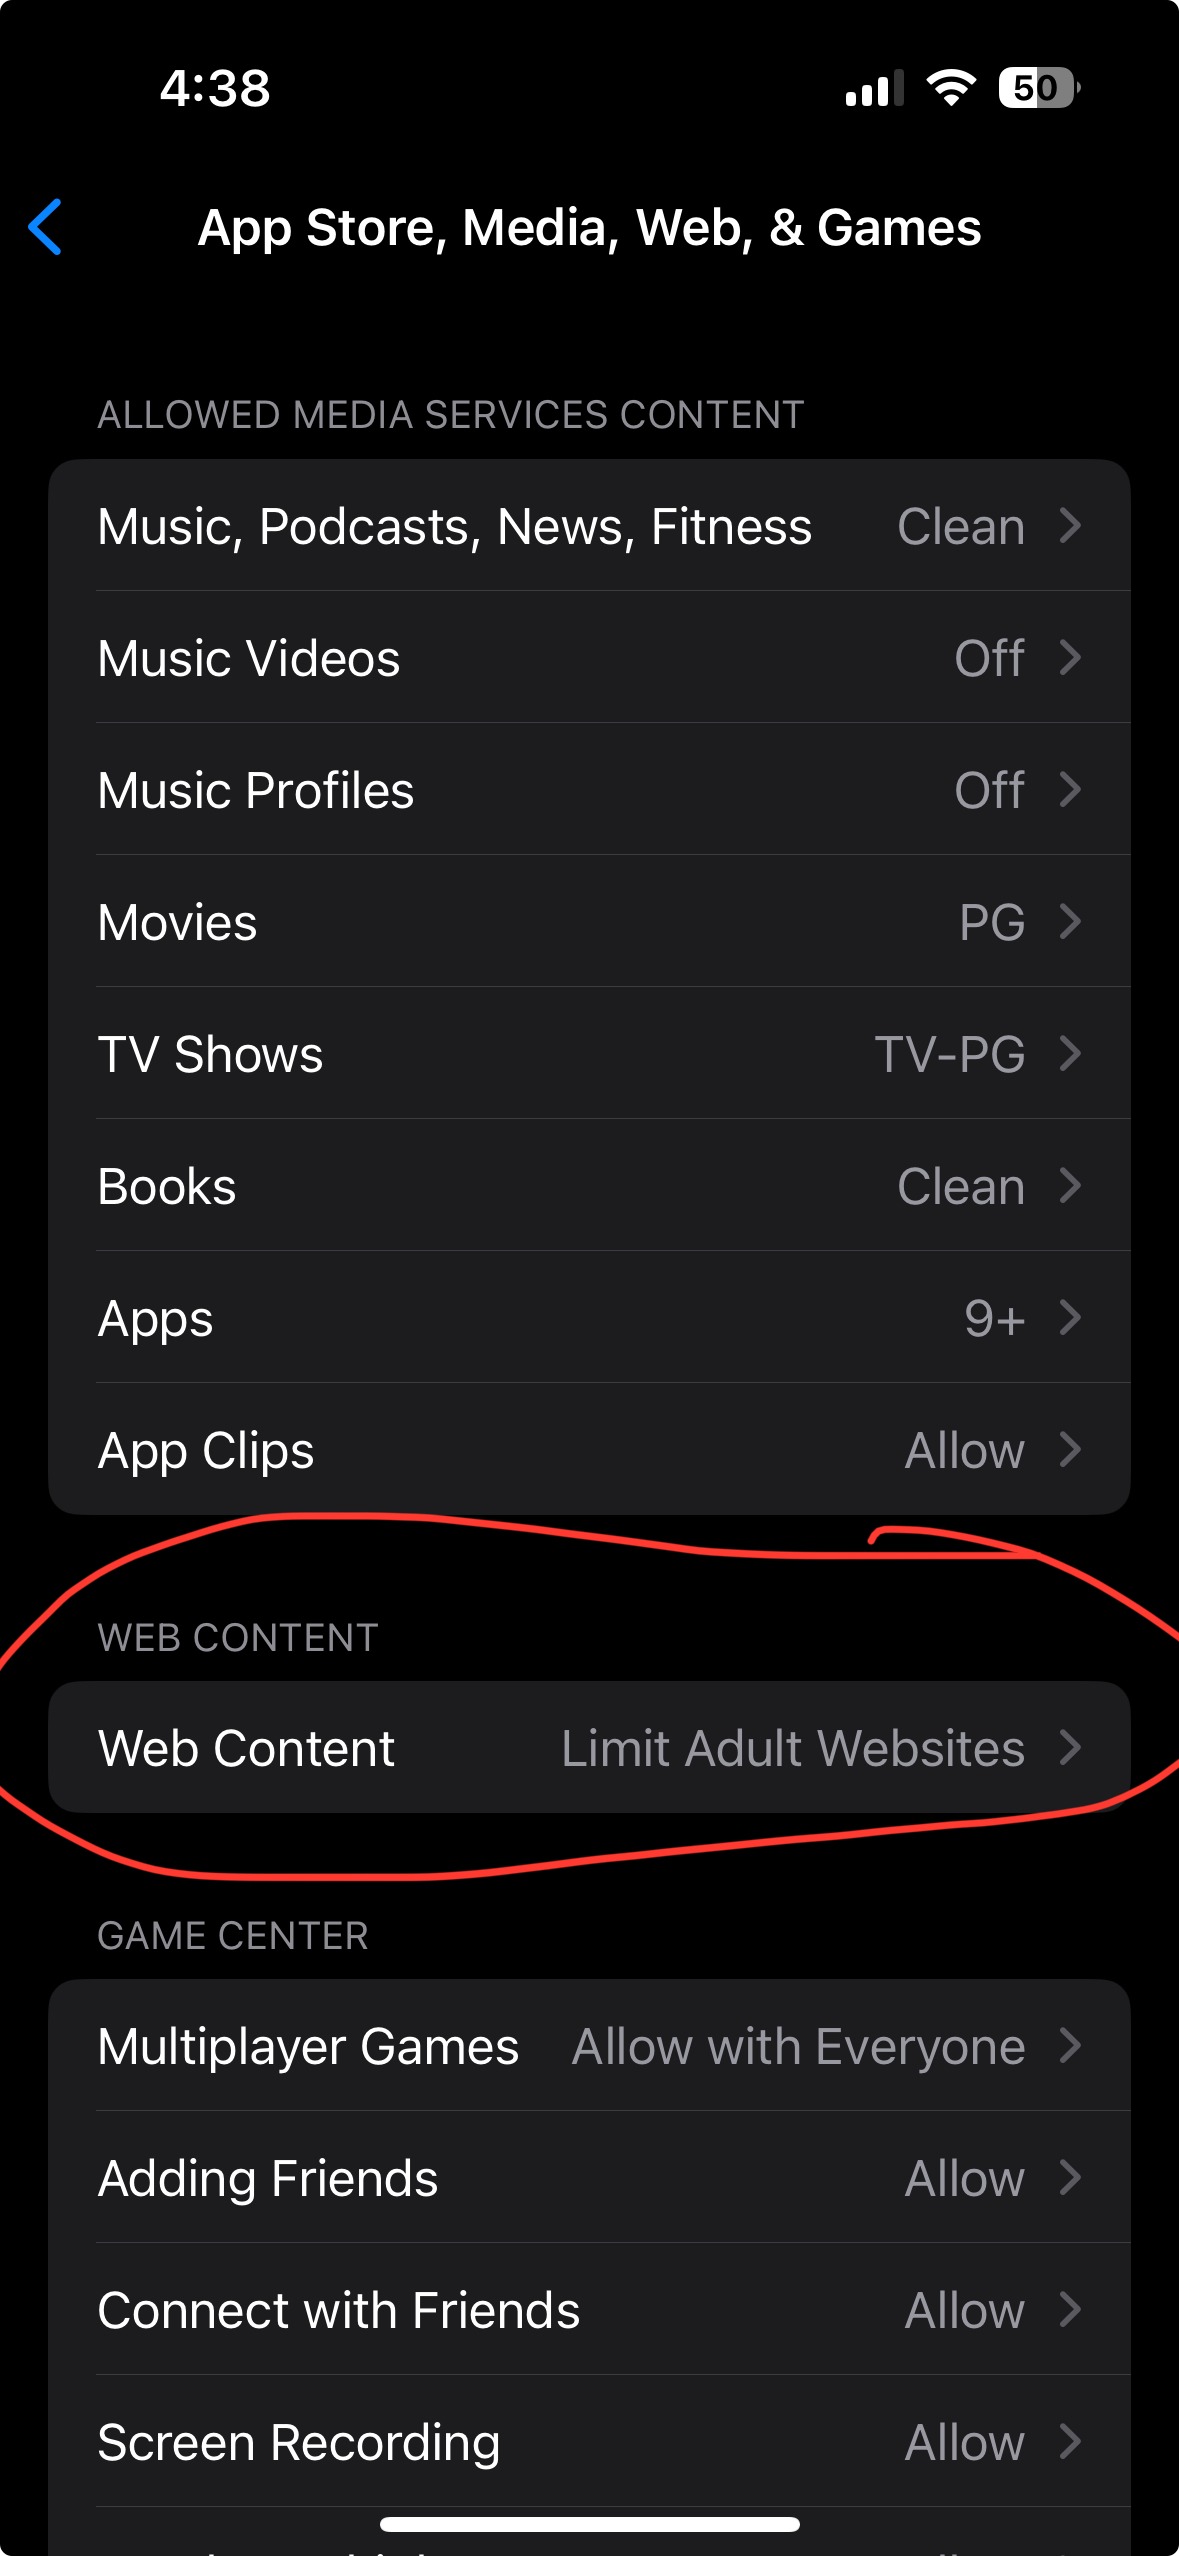
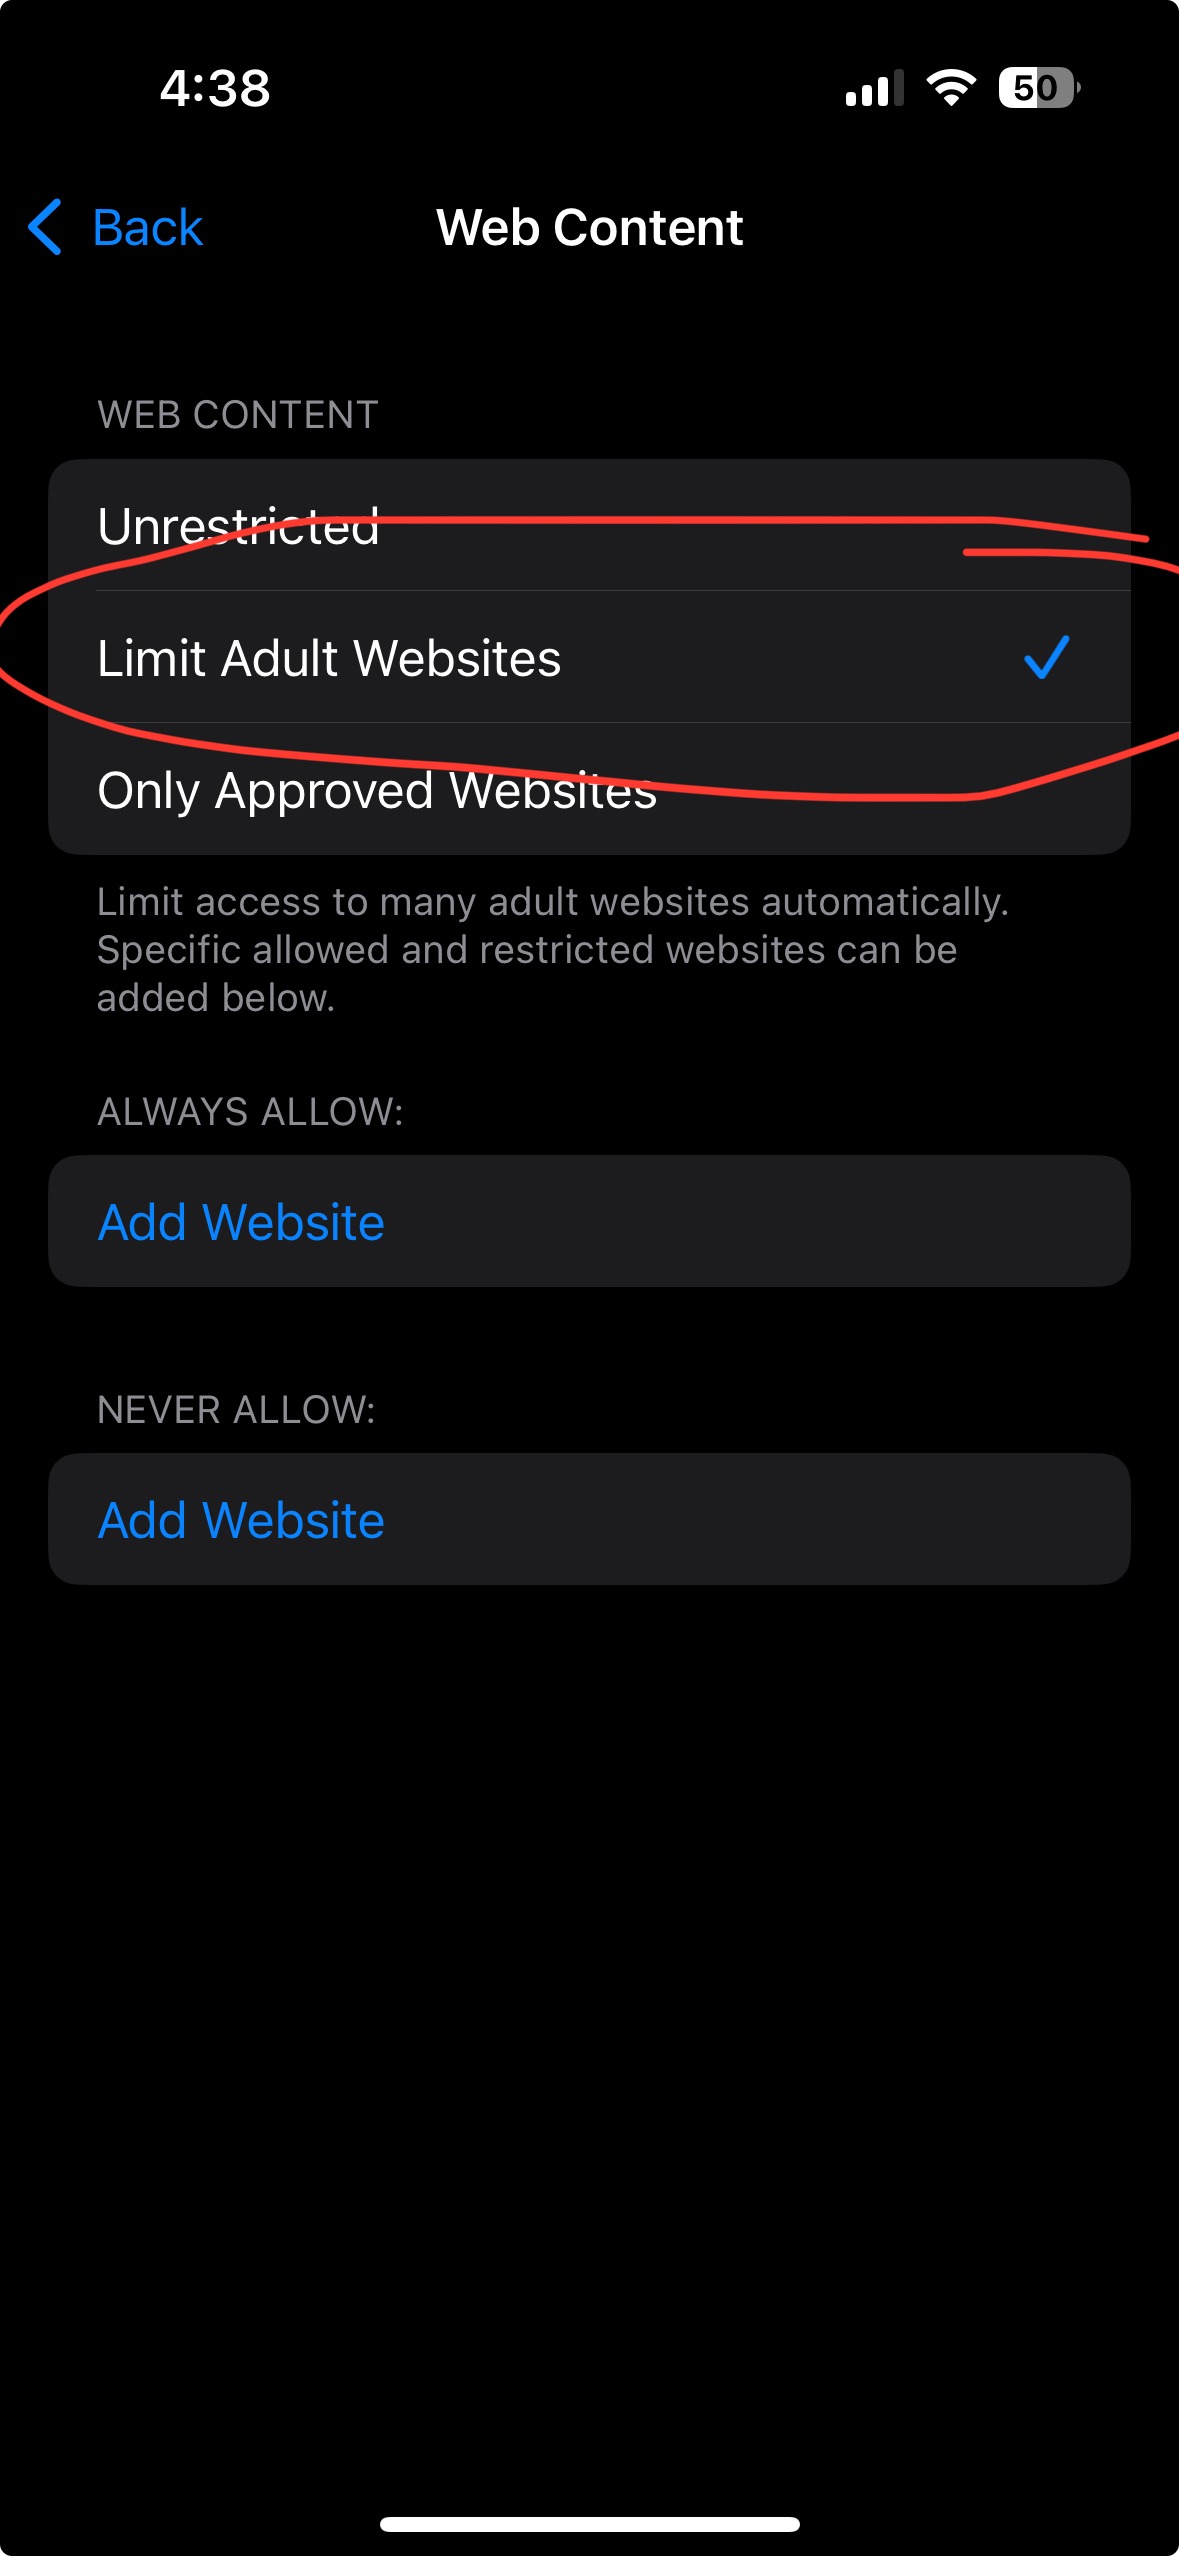
Set this to: Limit Adult Websites → Recommended default. Blocks most explicit sites but still allows everyday browsing.
Allowed Websites Only → Best for younger kids (ages 9–11). You create a list of safe sites, and everything else is blocked.
Unrestricted Access → Avoid this for kids and teens.
Game Center
Inside Content & Privacy Restrictions → App Store, Media, Web, & Games → Game Center (same screen you have been in), you’ll see a number of settings.
Here’s how to approach them:

Multiplayer Games → Turn Off for younger kids. May be fine for older teens if you’re comfortable with online play.
Adding Friends → Keep Off for tweens. For older teens, only allow if you’ve already talked about safe online interactions.
Connect with Friends → Works similarly to Adding Friends. Best Off for younger users, or keep On for older teens who can handle friend requests responsibly.
-
Nearby Multiplayer → Turn Off to prevent strangers nearby from trying to connect. (if you have multiplayer games off already you will not be able to toggle this, as it is already set to off then.)
-
Private Messaging in Games → Best set to Off unless your teen is mature enough and you’ve discussed safe messaging.
-
Screen Recording → Keep Off for younger users to avoid accidental sharing.
-
Profile Privacy Changes → Set to Don’t Allow so kids can’t suddenly make their Game Center profile public.
-
Avatar & Nickname Changes → Optional, but for younger kids, it can be helpful to lock this down to prevent inappropriate nicknames.
iOS 26 update: Children can now request “exceptions” to limits you’ve set. Now they can ask for extra screen time or permission to use an app. You’ll receive a notification and can approve or deny from your device.
Step 6: Set Downtime, App Limits, and Communication Limits
These settings will keep the phone from running your child’s schedule and help with boundaries like sleep and school focus.
iOS 26 update: When a child tries to message or call a new number not already on their approved list, they now have to send a request for permission in Messages. Parents receive the request instantly and can approve or deny from their own device.
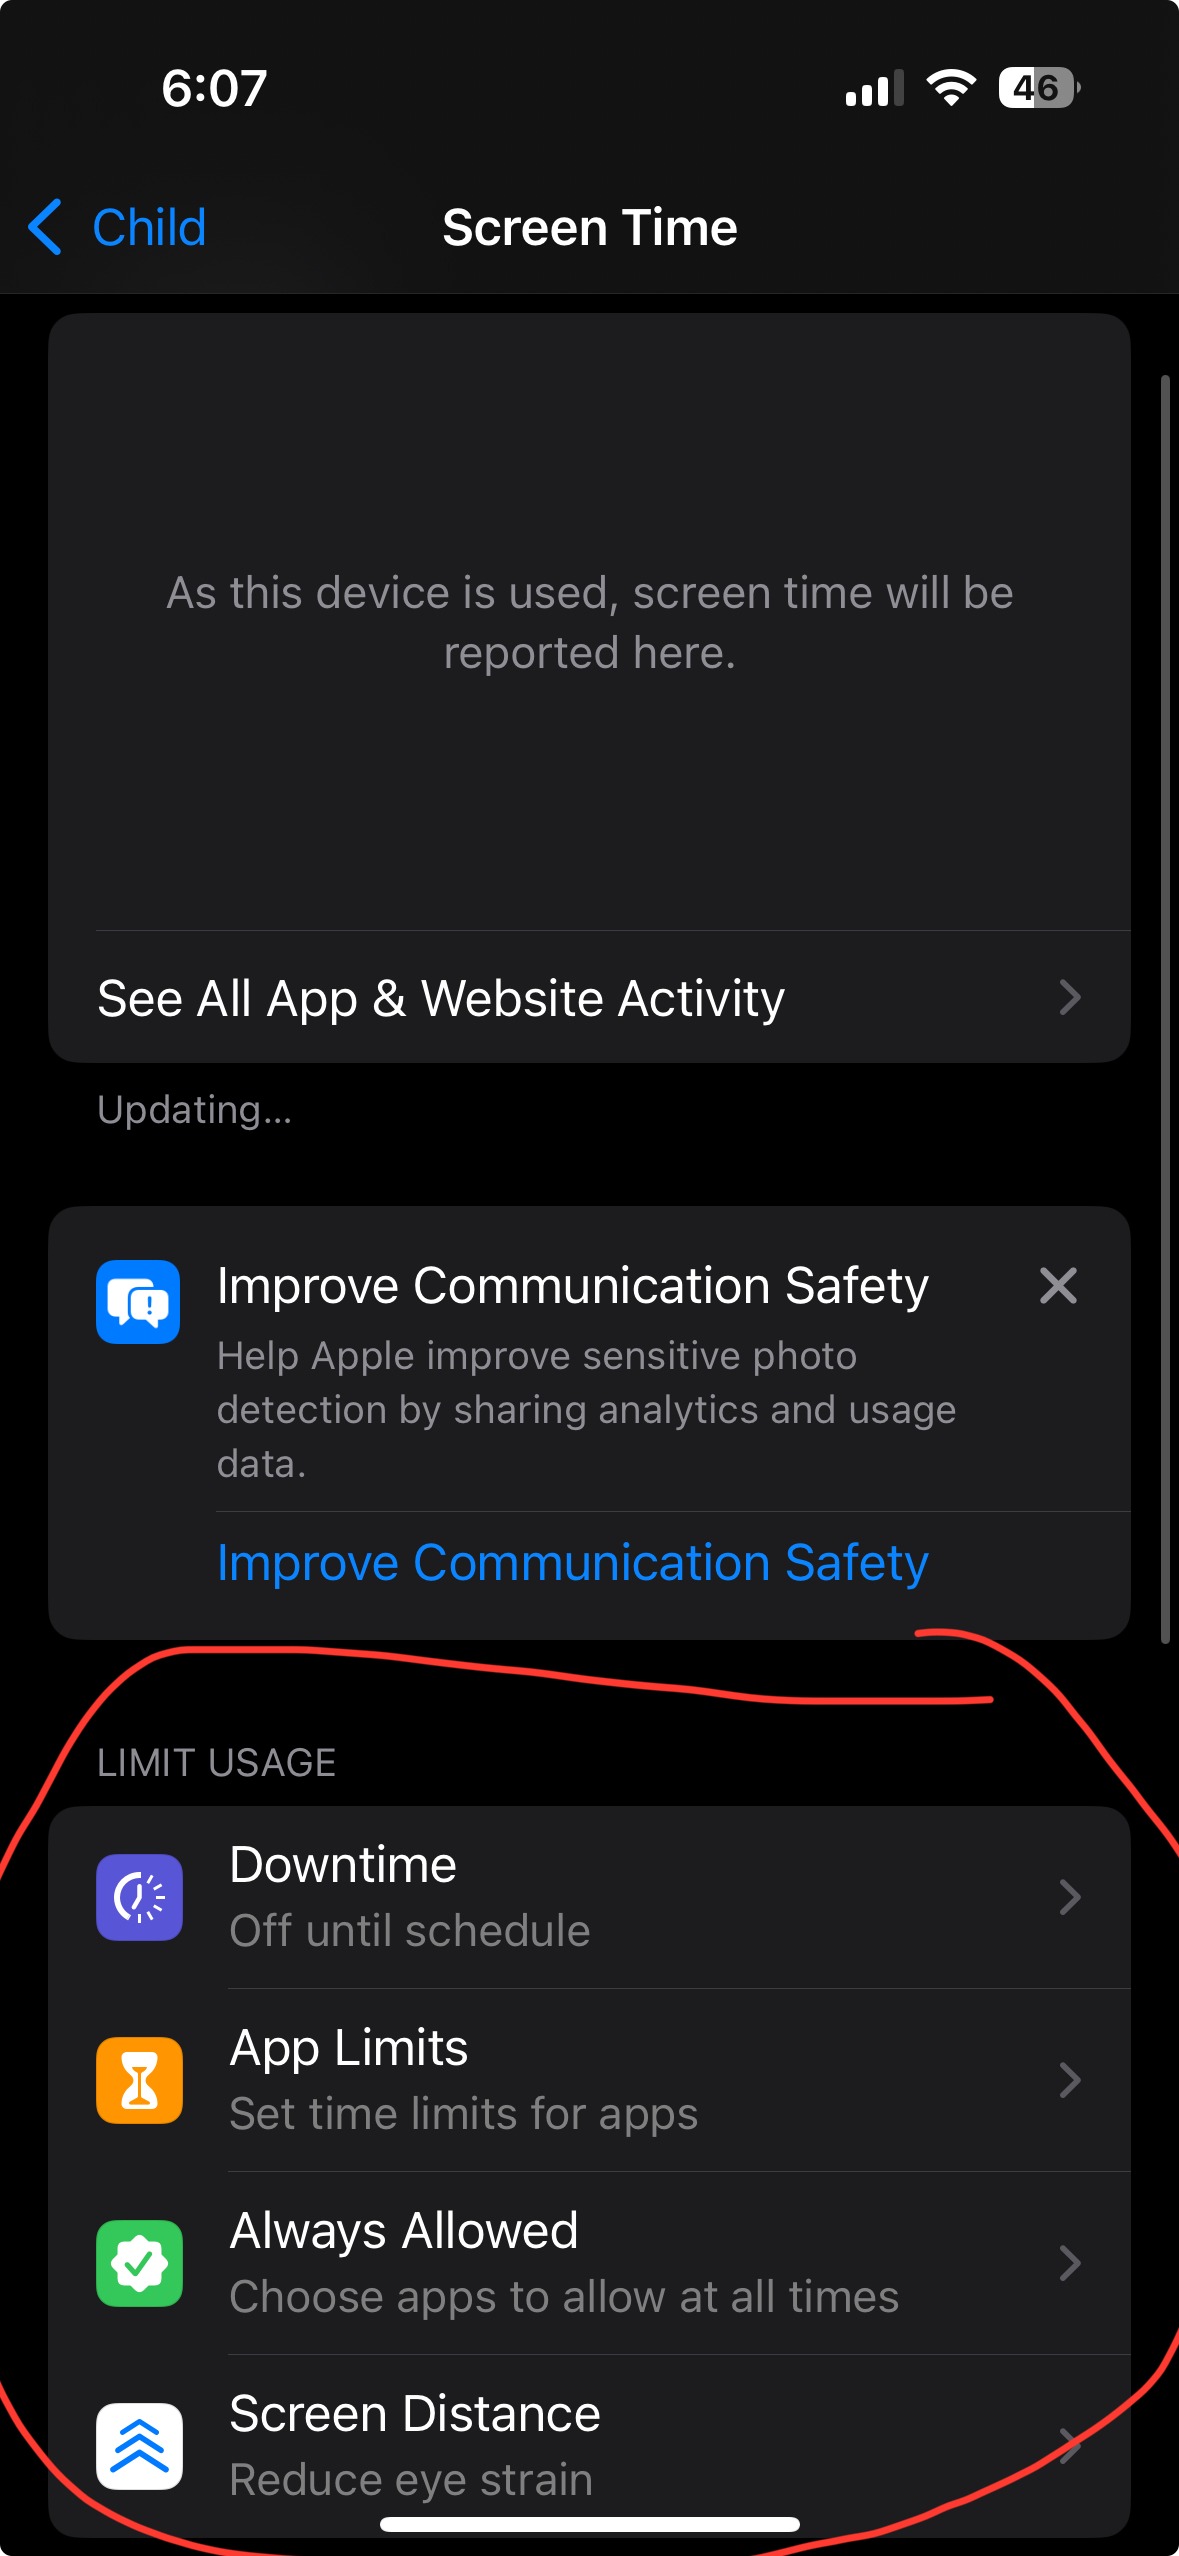 Go to Settings → Screen Time → [child’s name] (photo to the left). If you cannot find this you may have you may have gone to settings → family → child’s name- it’s not in there, within your general settings if you scroll down you will tap screen time then scroll down again to find your child’s name.
Downtime: Schedule when the phone shuts down at bedtime
App Limits: Set daily caps on games, social media, or videos
Below App Limits there is a setting for Always Allowed which you may want to turn everything off depending on your child.
Communication Limits: Control who your child can text or call during school hours or at night
Step 7: Turn on Safety Extras
Don’t skip these small but helpful settings:
-
Location Sharing: Settings → Family → Location Sharing (great for pickups or emergencies)
-
AirDrop: Settings → General → AirDrop → Contacts Only (also turn off NameDrop)
-
Emergency SOS & Medical ID: Settings → Emergency SOS (here you can add in an emergency contact too) I like to have call after severe crash on in → Crash Detection.
Save This List
Here’s a view of all 7 steps (screenshot this for later):
- Add to Family Sharing
- Turn on Ask to Buy
- Set up Screen Time with parent passcode
- Enable Communication Safety
- Content & Privacy Restrictions (limit adult content)
- Downtime, App Limits, Communication Limits
- Safety Extras (location, AirDrop, Emergency SOS & Medical ID)
I know it’s a lot of settings, but you really can do this. Take it one step at a time. Every change you make gives your child a safer foundation for phone use. If you get overwhelmed take some time and come back to it. These settings really make a difference!
Remember: settings are only half the picture. The other half is building a safe trusting relationship for your kid to trust in. As I said in the beginning, these settings provide some basic guardrails but they are not foolproof. Kid’s are smart and creative, and they can figured out ways to get around some of these settings. So please don’t just set up the phone with these settings and believe that your child’s phone is now fully safely “kid-proofed”. Kids need to know why you’ve set these limits and that they can come to you if something online feels confusing, uncomfortable, or unsafe. You’ll also need to keep an eye on how they are doing, behaviorally and emotionally, once they have a phone.
If you’d like help starting those conversations:
👉 Download my free Family Tech Guide & Agreement- a parent guide plus a customizable contract to fill out with your child
👉 Take the 2-minute Smartphone Readiness Quiz- even if your child already has a phone, this will show you where they’re strong and what skills they may still need